Friday, October 29, 2010


Tuesday, October 19, 2010


Wednesday, October 13, 2010

Monday, October 11, 2010
Food

So I am very interested with casting food. I made a silicone mold of a popcorn but not sure I like how it came ot but i bet it would look really cool enamelled in white. I am also making Marie biscuits which by the way originally were made in Durban in a Factory in the early early times(I will get the exact date) Obviously that is only one type of marie that was made in that factory, the name Marie is it's generic name so no one has the right to claim it. Marie biscuits are made all over the world!
Sent from my BlackBerry® wireless device
Funny rings/pendants
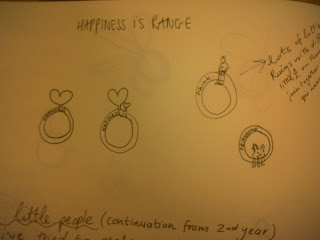
I have already made one happiness ring. It is like the one on the far left. I am still waiting for my letter punches to arrive here in the post so that I can make more and different types including some of the little people with them. I ordered them from Ireland. The ring I have already made is stamped with Happiness on the shank.
Sent from my BlackBerry® wireless deviceEdited post:
Here is the ring I was talking about above.

Drawing with wire

I would like to try drawing with wire and creating shapes and flowers that are out of preportion and i suppose I could say free. Free from their predictable shape and far more expressive and raw.
Sent from my BlackBerry® wireless devicedried orchid

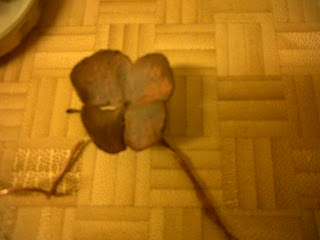
This orchid that is dried out now was a wild one from marlene's orchids. I want to cast more orchids like the one I did in February and use their petals etc to make some interesting jewellery.
Sent from my BlackBerry® wireless deviceSpoons

I have been wanting to make shanks out of the ends of spoons. My mom has got spoon colections and this idea came to me whilst we were having pudding and I was examining the silver spoon I was using. the spoon on the left which is not very clear we dated back to 1902. Nick has a book full of hallmarks and hteir time/ era and we found the hall marks and where they were from in on this spoon in the book. this spoon comes from sheffield in England.
Sent from my BlackBerry® wireless deviceown work- Hydrangeas

This is another section of my work, my hydrangeas. I cannot wait till December whne I buy my own hydrangea bushes and plant them. They change colour according to the acid balance in the soil.
Sent from my BlackBerry® wireless deviceLittle people

I am doing many things at the moment and one of them is creating little people out of silver which I carve. I need to make more!
Sent from my BlackBerry® wireless deviceSaturday, October 9, 2010
hydrangeas in progress

Ideas of how to place the flowers onto the shank. I enjoy how they wrap around the finger but it would possibly only be comfortable on this finger.
Sent from my BlackBerry® wireless deviceFriday, October 8, 2010
Enamelled hydrangeas

I really like the colours that came out on the 960 hydrangeas. They are not as bright as fine silver but more rich or deeper than fine.
Sent from my BlackBerry® wireless deviceWednesday, October 6, 2010
Silver hydrangeas and plastic ones

I have been making more silver hydrangeas but this time out of 960 silver to make them a little harder when they are finished. will see how the colours change! You can see the light green and ourole colour on the plastic hydrangeas aswell.
Sent from my BlackBerry® wireless deviceDyed plastic

I died this plastic with a dye that was purple and a dye that was green. The photo is unclear so I will have to take a better one but the colours came ot soft purple and soft green. It depends on what plastic you use
Sent from my BlackBerry® wireless devicePlastic sample

The hydrangeas that I cut from the plastic were from this bottle.
Sent from my BlackBerry® wireless device
Plastic flowers

So I have been experimtenting with making my hydrangeas out of another material and I have been using plastic. I quite like how they mix with the metal ones in this picture. I am going to die them to another colour.
Monday, September 27, 2010
An Electroformed flower about to be heated

I am going to heat this flower but am going to heat it with a flame that has very little oxygen to see if it will stop the lacker in side the copper shell from reacting and splitting the flower open in half

electroforming and heat: The flower split into two

The flower now has a brittle feel. I have come to a realisation that i cannot solder with these electroformed flowers so I'll have to think of a good way to attach them to the piece of metal(?) that I want to use. I need to make a whole lot more!!
Wednesday, September 15, 2010

Plastic hydrangeas

I am trying dying plastic and recording which plastic I used to keep a record of it for future use! I enjoy the way that i can see through some of the plastics.
Sent from my BlackBerry® wireless deviceThursday, September 2, 2010
Crit
I had such a nice talk with Brenda. One way I could strengthen my hydrangeas that have been electro formed and burnt away is by adding a layer of clear enamel to the back and the front of the enamel and to see what colour comes out they could be really beautifully enamelled! I need to stop worrying about the jewellery form that is going to be created around the hydrangeas and just start exploring more with my electro forming by experimenting a whole lot more. There is no problem with my work being very delicate, who ever buys it if they do will just have to be careful. I need to not focus on the metal thickness es and just start enjoying my process of electro forming and the element of surprise in it!
Sent from my BlackBerry® wireless device
Sent from my BlackBerry® wireless device
Wednesday, September 1, 2010
The process of my electroforming- techniques
So there are lots of chemicals, lots of science and a whole lot more. So I started out with tech's rectifier which is normally used to electro plate. I did not do science at school so this has been quite a challenge as I did not even know that somwthing called a cathode and anode even existed. I mixed up my electro bath chemicals, got my object lackered and then painted with copper dust to make it conductive and started the whole process. But the process never started as I could not get any amps on the amp meter, I could only get vaults. After sitting on the couch hoping things would some how get better, I phoned my dad to ask what the solution was but the only thing he could think of was to tell me to check if there was current in both the negative and positive conductors. After a whole lot of experimenting on possible reasons why the rectifyer did not have any amps. I by chance tried adding another piece of copper from the cathode to the actual object I was electroforming and the amps shot up! I was so delighted! obviously there was not enough connection. I then ended up setting the amps to 2 amps and I completely burnt the flower causing it to get balls of copper on it that flaked off.


Copper conductive dust
The rectifier I am using
 electro bath- becareful!
Conductive flower

Wait and see.......
The viability of my work?
wow big word... at the moment my greatest point of interest or concern (I dont like that word as i feel it brings a negativity to the issue) is how can I make jewellery that is sellable but still has my own hand made delicate feel in it that my work has at the moment. I feel like I need to create work that looks very delicate just like my hydrangeas do but is not really that delicate when handling it. I dont even know if it is possible because as soon as I start adding more thickness to metal it changes the feel of my flower. one of the main characteristics I focus on in the hydrangea flower is the delicacy of the veins and the thinness of the petals. I feel like I will sell these pieces of jewellery more if they were not so delicate but then I would be changing my jewellery and the designs that make my jewellery mine. ????
Wednesday, August 25, 2010
Other Jewellers that have used electroformimg
I am in the process of designing and trying to make a ring with a setting out of wax and then electroforming it but I have no idea how it will work. I have just seen on carrot box a lady who has been electroforming objects to make rings etc. look at the link below http://olgakosica.com/index.php/photos/album/25/photo/363.html
one of her rings with a setting is similar to what I am busy doing.
one of her rings with a setting is similar to what I am busy doing.
electroforming process- technique
The first electro forming I did was where I was taught by Kirsten at her and her dads workshop where she showed me their process of how they electro formed shoes for their business and she helped me elecrto form some leaves and flowers. I had prepared my very dried out hydrangea flower by dipping it in lacka (spelling?) and letting it dry as you can see below. I had already attached the copper wire to it making it part of the flowers conductor.
 I love the crinkled up edges of a dried hydrangea! each flower has its own character as they each take a different shape when they dry.
Next I had to cover all the surface area of my hydrangea with conductive copper dust which can only be bought in KG's so Kirsten kindly gave me some! The flowers look so pretty in the copper paint! The sinker is to weigh the flower down so it does not float in the electroforming bath.
 Now we had to wait to for it to dry..................
Wednesday, July 28, 2010
Electro-Forming- Technique
Iv tried casting, I'v tried making by hand and now I am on a new discovery of trying electro-forming! Just like electro-plating where you take a conductive object and you plate it with another metal using anodes and cathodes and positives and negatives ..... (I did not do science!!) But this is the tricky part, I am taking an organic object that has nothing conductive in it and i am copper plating it so it is actually being formed into metal by creating a metal cover over its outside, and what happens to the inside I donot know but am going to find out along the way!
A very lovely lady Kirsten has been extremely helpful by starting me off and teaching me a few things (alot of things) and even letting me use her electro bath and chemicals to help me start off my electro forming flowers. Her dad and her have a "Baby shoe" bronzing business and they have been sooo kind and helpful.
I have come across many challenges already and have not even properly started yet. It has been the most challenging process I have tried for my research so far just in terms of finding out scientific "stuff", having the guts to phone people I don't know and to ask questions and use equipment that is owned by someone else and then also trying to source products that come in kilograms when I need less than one thenth of that, but I was so greatful to find people that were so willing to help me.
So the next at least month is going to be some extensive testing and documenting to try and explore electro forming as much as I can. at the moment my only set back is that I need to get Plascon thinners and they only sell it in 10 leters and I need a cup of it! :)
today my challenge is to find out the ratio of copper sulphate to acid to water for a 1l beaker and not a 95 l bath. I have to do the math!! and I need to get that thinners!! And to start my first batch of electro plating at home!
A very lovely lady Kirsten has been extremely helpful by starting me off and teaching me a few things (alot of things) and even letting me use her electro bath and chemicals to help me start off my electro forming flowers. Her dad and her have a "Baby shoe" bronzing business and they have been sooo kind and helpful.
I have come across many challenges already and have not even properly started yet. It has been the most challenging process I have tried for my research so far just in terms of finding out scientific "stuff", having the guts to phone people I don't know and to ask questions and use equipment that is owned by someone else and then also trying to source products that come in kilograms when I need less than one thenth of that, but I was so greatful to find people that were so willing to help me.
So the next at least month is going to be some extensive testing and documenting to try and explore electro forming as much as I can. at the moment my only set back is that I need to get Plascon thinners and they only sell it in 10 leters and I need a cup of it! :)
today my challenge is to find out the ratio of copper sulphate to acid to water for a 1l beaker and not a 95 l bath. I have to do the math!! and I need to get that thinners!! And to start my first batch of electro plating at home!
Thursday, July 15, 2010
This is what happens when the electric roller is hungry


Sent from my BlackBerry® wireless device
Monday, June 21, 2010
The difference between my cast hydrangeas and my hand made ones
My cast hydrangeas ( that i cast in march) show the veins in the flower well in silver. I had to find a way of creating these veins in the silves. so i took a sharp skelpel blade and started off with that. It turned out that the back of the hydrangea looked more beautiful than the front as the veins stuck out at the back and were imprinted in the front. 
 The cast hydrangeas. I am still going to try electroplating the hydrangea flower.
The cast hydrangeas. I am still going to try electroplating the hydrangea flower. 
Hand made hydrangea, the back of it where the veins stick out.

My reference

A hydrangea neck piece in the making
Monday, June 14, 2010
NSA jewellery on show
Tomorrow we exhibit our jewellery in 2 big show cases at the NSA art Gallery . After a very long discussion at tech on thursday morning about how 10 of us B tech students would show our work together and somehow get each student who is desiginning their own jewellery to look good as a whole, I have decided to use white perspex and to put my work on that. I will have to see how it intigrates with every one else's displays tomorrow.


I created some of my hydrangea range for this exhibition: (thumb nail size for now)
Monday, June 7, 2010
NSA exhibition

Sent from my BlackBerry® wireless device
New ideas

Sent from my BlackBerry® wireless device
Using different parts of flowers
I was watching a video by Nora Fok on Michelle pujols blog and found it fascinating how Nora creates this amazing neck piece/ work of art by using a protea that she takes seeds out of the protea from the inside and creates this amazing piece using these seeds.
I think I need to start taking detailed bits of flowers and different aspects of a flower how Nora has done instead of taking the flower as a whole and recreating it or something that looks like it. here is the link to see what i am talking about ... http://www.youtube.com/watch?v=UKGpsY8dNdQ&feature=player_embedded or http://michellepujol.blogspot.com/
I think I need to start taking detailed bits of flowers and different aspects of a flower how Nora has done instead of taking the flower as a whole and recreating it or something that looks like it. here is the link to see what i am talking about ... http://www.youtube.com/watch?v=UKGpsY8dNdQ&feature=player_embedded or http://michellepujol.blogspot.com/
The flowers on the walk way near moses Mabida


Sent from my BlackBerry® wireless device
Subscribe to:
Posts (Atom)